Best practices to make your own sample packs
It’s now been a number of years since I’ve been making samples and I thought I would share my process for creating packs.
the first time you make a pack will help you learn how you best work and your own workflow but below is what I’ve found works best for me and after making more than 20 packs and over 2000 different samples I’ve found this works best for me.
Firstly, the process is quite structured so that I know that I’ve gone through every step, Even so these steps can be rearranged sometimes depending on your creative flow. for example I might skip the planning step if I’ve already got a number of samples I think work well together, but I will always need to go back to think about how I will market this pack such as title and description.
Steps:
- PLANNING
- RECORDING
- EDITING
- MIXING
- EXPORTING and checking # FINDER / TRANSNOMINO
- RENAMING files
- DEMO TRACK
- PROMO ARTWORK # PS
- PROMO VID #FCPX
- Planning
It’s good to have an idea before you start sample pack of your limitations (in fact this is good for pretty much anything from songs to books). for example if I already know the title of my sample pack- such as “oriental flutes”- I’m not going to be including any drum samples from a techno genre. it’s also sometimes helpful to try and write a description of what your sample pack will be before you start- this doesn’t have to be finished usually I do a draft and then finish it at the end.
- Recording
This is the most creative aspect of the process. I’d like to include as much improvisation in this part as I can, So usually I will have essentially backing tracks of drum loops bass loops or other polysynth loops that I will record my main instrument over. I’ll usually do this in session mode and record one big long improvisation and then move on to the next loops. this then needs to get cut up in the next step of editing.
- EDITING
Editing can be the most tedious of all the steps because this is where you cut down your recordings and make sure they’re ready for final export. one problem with doing large improvisations to create samples is that you then have to go back over and edit them. sometimes I will play a phrase that like and then I’ll repeat that phrase four or five times to have different variations, I might then need to choose the best of the four variations. In abelton I use color coding to show which my favorite samples or which ones might be different to different variations.
* tip don’t forget command E to cut samples. and command J to consolidate samples
- MIXING
If you’ve set up your recording well – good microphone placement, good levels etc -this process of mixing shouldn’t be too hard. this is where sample packs are different too final productions. We generally DO NOT WANT EFFECTS on our samples- especially audio instruments. This isn’t always true but many samplepack providers have separate polders for dry or wet effects packs. Generally I go for dry effects, this means no reverb no delays etc. why we do this is so that the producer who buys the pack can add whatever they like. if there is already reverb printed into the track this reverb might clash with other instruments in their track and they can’t take that away. when they have a dry file they can always add it in with the exact same reverb they have already.
if you do want to provide wet effect samples it’s usually good to provide a dry and wet folder so that you have both- the other benefit of this is you can make two samples out of 1, possibly doubling your sample pack size.
- Exporting
**Files have to be renamed in a very specific way so maybe read the next step then come back to this one even though this comes first.
AUDIO:
There are two ways to do audio exporting, one is for clips that need no effects at all except normalization, the other is for clips that have some effects.
If you’re working with clips that are already cropped or consolidated and require no effects to be added you can actually take these already cut clips from the samples folder within the abelton project. make sure you copy them otherwise you will lose them from your Ableton project.
if you have samples with effects there are two ways to deal. 1) if the effect is just on that single track you can freeze them and then similar to before copy the files out of the freeze samples folder. Note* this will not add any return or master effects-only the effects on that individual track will be printed on the freeze clip.
2) if you are using clips which require effects from return or master track this can be the longest process as you have to individually export each one. if the clips are consolidated into one you can either do this in arrangement mode or session mode, it should not matter. Simply click on the clip and export with command shift R.
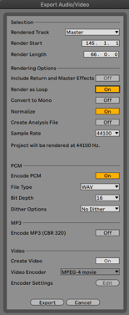
Generally the default settings of 44.1 Hertz and 16 bit WAV will do. I do not include a dither option as this is usually for mastering. Normalize will depend on your samples if you have already put them through any kind of mastering or compression it won’t make much of a difference, but if the samples are soft you may want to normalize them. Note* normalization adds a little bit of time to the process.
Render as loop will print any effect tails such as delays into the loop beginning.
MIDI:
If I’ve recorded a long improvisation in MIDI and then cut the clips down to size by either cropping or consolidating (cmd J) I have my final files that are ready for export. I usually put the final MIDI files into session view for easier counting and renaming. I often partly rename my MIDI files here as it’s quite fast to do in session view rather than in finder on mac. All I usually do is add a number to them -you can quickly switch through session view renaming them – cmd R – number then tab or enter.
You then have to export each MIDI file individually by selecting and cmd E. I put all of one track in a folder and then leave them for the renaming process.
A few other key tips from the splice content submission guidelines:
-All samples must be wholly created and owned by you
– All material submitted must be royalty free
– Samples should start and end on zero waveform crossing points
– All samples should have adequate headroom and be normalized at -1db
- Renaming files
Similar to editing, exporting/renaming is a rather tedious process and requires good technical skills and file management. I use macOS and finder has a pretty good rename function for multiple files that includes replace text, add text and format. Most of the time this is enough but there are also other options such as Transnomino (free) which allows stacking of renaming functions as well as wildcards. You can also make something yourself in Mac Automator.
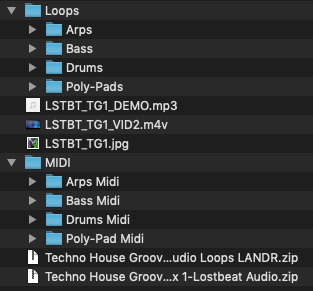
Generally a sample pack file structure will be as follows
folder: [sample pack name] – [Sample pack label]
– folders: Loops, oneshots, – then organized by BPM or instrument
Make sure to follow the guidelines of the sample pack distributor you are using. Some of them are very strict and will not accept if there is even slight errors in your file structure or file naming.
All of my samples are labeled with my label name and then an SKU number (stock keeping unit) for organization. LSTBT_TG1
Splice for example is pretty exact about their file naming conventions. taken from there content submission guideline of 2020:
artistcode_type_name_tempo_key_.filetype
Type – Type of instrument or sample
Name– can we description of the sound, I generally use a number (eg. flute_15)
Tempo– the BPM marking
Key– what key the sample is in- the nomenclature convention here is to use and capital letter for major (eg. F) and a lower case m for minor (eg. Fm). For sharp and flat keys some providers I only prefer to use sharp or flat, not both. So generally I use sharp as it uses a special character (#) rather than just a lowercase B (b). Example (C#, F#m)
Artist code is a 5 character code. Spice was the first Provider I made for and I’ve just kept the artist code LSTBT for every other pack I make.
Some full file name examples here: (name, tempo key are not always in order)
My file name convention includes the SKU after the artist code
artistcode_SKU_type_name_tempo_key_.filetype
LSTBT_TG1_1.3_Arp_C_120
LSTBT_JC2_keys_piano130_56_jazz
LSTBT_OF2_xiaoflute_100_Dm_70
LSTBT_OF2_hulusi_oneshots_Gm (doesn’t require BPM as its oneshots)
=Lostbeat Audio – oriental flute 2 – Hulusi flute, oneshots, in Gminor
Fast Batch exporting samples from Ableton
It’s now been a number of years since I’ve been making sample packs and I thought I would share some tips on how to best export from abelton both MIDI and WAV files.
there are some tricks that can help us to get this process faster
- Promotional – Demo track
To create a demo track of the sample pack what I usually do is making a new Ableton project and create a song using only my samples. Most of my sample packs are melodic only samples that do not include drums, thus I sometimes use other drum samples or create new ones for the demo tracks. overall you want listeners to hear the best parts of your sample pack but also a range of different samples. Having analyzed YouTube watch data over the last 10 years the average watch time from YouTube has gone from 1.5 minutes to about 30 seconds so I try and keep my demo tracks pretty short (1-2mins, usually 1min).
- Promotional – Artwork & Video
ART – Photoshop
Most samplepack distributors require an artwork. you can either outsource this to someone else or learn to do the basics yourself – it really doesn’t take much.
Two great resources are Adobe Creative Cloud express (free) and Adobe Photoshop. I’ve tried previously to work with GIMP (free photo editing software) but found it to be too annoying having been used to Photoshop.
Most distributors require a square image 500×500, or 1000×1000 pixels JPG or PNG. make sure you have your label name, the sample pack name and what kind of sample pack it is (eg WAV or MIDI or whatever).
Tip* make sure to zoom out and view this image small (cmd – in photoshop). most of the time this will only be viewed as a small thumbnail on the distributor’s website, this means as a small image it has to be big enough to read the title and the image must still be clear.
*Try online MOOCs to learn photoshop for free online. Or attend online workshops such as Photshop virtual summit and Adobe MAX conference.
VIDEO – Final Cut Pro
Video has become one of the most successful promotion tools online so it’s important to make even a short video to promote your sample pack. I generally aim to keep this around one minute but can go as long as the demo track. Keep in mind most Instagram videos are limited to one minute.
Even if you’ve not done video editing before it’s not difficult to put together a simple reel that will promote your pack.
- start with a good program. I use Final Cut Pro but there are some excellent free video editors both professional like daVinci resolve or a bit easier such as shotcut.
- start with stock video that you can import into your program- free stock photo / videos websites such as Pexels or Unsplash can help you.
- I put together two or three videos over the one minute repeating them if I need to, or slowing them down if I need them to take more time. add transitions and effects and you have your background
- Titles- make sure you’ve written your description for your pack before you add titles. you want to have important information that you can include in the video already planned out. I don’t try and put too much information but between three and five titles explaining the key points of the pack.